Vent Gate and Extraction Fan Operation
Overview
This procedure describes how to operate the AuxTel vent gate and extractor fan—both remotely via the ATBuilding CSC and, when needed, using local manual controls—to ventilate the AuxTel enclosure in preparation for and during on‑sky operations.
By opening vent gate #3 and running the extraction fan within defined wind and humidity limits, observers can flush warm, stagnant, or moist air from the enclosure and promote a more stable internal environment, reducing dome seeing and thermal gradients that degrade image quality.
Weather Constraints
Operation of the vent gate is dependent on the AuxTel weather constraints. In general, only operate the vent gate when:
Wind speeds are \(< 10\) m/s.
Relative humidity is \(< 70\%\).
Precondition
Before taking the decision to open the vent gate, review the weather conditions and weather constraints page.
AuxTel is fully ready to operate and all components are enabled.
The daytime checkout has been executed successfully.
Observers will begin venting AuxTel or on-sky preparations.
Post-Condition
If venting AuxTel, vent gate is open and extraction fan is on.
If preparing on-sky operations, vent gate is closed and extraction fan is off.
Procedure Steps
Note
Monitor each step in the procedure using the ATBuilding Chronograf Dashboard.
Activate Vent Gate and Extraction Fan
This section outlines the steps required to open AuxTel’s vent gate and power on the extraction fan. This procedure is for when AuxTel has begun its venting procedures.
Set CSC Control
Verify that ATBuilding CSC is
ENABLED. If not, enable it using either LOVE’s ASummaryState or with theset_summary_state.pyscript in ATQueue.set_summary_state.py¶data: - [ATBuilding, ENABLED]
Change control of ATBuilding from Manual to CSC using the
run_command.pyscript with the following configuration:run_command.py¶component: ATBuilding cmd: setExtractionFanManualControlMode parameters: enableManualControlMode: False
Check on Chronograph that the
Extraction Fan Control Modeis now set toCSC.
Prepare for Venting
Open vent gate #3, and confirm on Chronograf that the vent gate state transitions from
CLOSEDtoPARTIALLY_OPEN.run_command.py¶component: ATBuilding cmd: openVentGate parameters: gate: [2, -1, -1, -1]
Note
The array consists of four elements, corresponding to the four vent gates. To operate a specific gate, add its ID (gate IDs are numbered from 0-3, counter-clockwise from the front entrance door). If no gate operation is needed, use -1 as a placeholder.
Turn on the extraction fan at vent gate #3, and set the target frequency to 20Hz.
run_command.py¶component: ATBuilding cmd: setExtractionFanDriveFreq parameters: targetFrequency: 20
Deactivate Vent Gate and Extraction Fan
This section outlines the steps required to close AuxTel’s vent gate and power off the extraction fan. This procedure is for when AuxTel has begun its on-sky procedures.
Stop Venting
Turn of the extraction fan at vent gate #3 by setting the target frequency to 0Hz.
run_command.py¶component: ATBuilding cmd: setExtractionFanDriveFreq parameters: targetFrequency: 0
Close vent gate #3, and confirm on Chronograf that the vent gate state transitions from
PARTIALLY_OPENtoCLOSED.run_command.py¶component: ATBuilding cmd: closeVentGate parameters: gate: [2, -1, -1, -1]
Set Manual Control
Change control of ATBuilding from CSC to Manual using the
run_command.pyscript with the following configuration:run_command.py¶component: ATBuilding cmd: setExtractionFanManualControlMode parameters: enableManualControlMode: False
Check on Chronograph that the
Extraction Fan Control Modeis now set toManual.Set the ATBuilding CSC to
STANDBYusing either LOVE’s ASummaryState or with theset_summary_state.pyscript in ATQueue .set_summary_state.py¶data: - [ATBuilding, STANDBY]
Troubleshooting
If any of the following issues occur:
Inability to transition ATBuilding CSC to enable
Commands are not producing the expected results
Interruption in ATBuilding telemetry
ATBuilding CSC enters FAULT mode
Then the solution will be to restart the Raspberry Pi software on the AuxTel vent gate.
Using a command line, open a secure shell to the host auxtel-vent-gates01.cp.lsst.org and reboot the Raspberry Pi.
>> ssh auxtel-vent-gates01.cp.lsst.org
>> reboot
If the reboot command does not work, restart the vent_controller container.
>> ssh auxtel-vent-gates01.cp.lsst.org
>> docker run -d --restart unless-stopped --name vent_controller --device /dev/i2c-1 \
      -p 0.0.0.0:17311:23 --user root \
      lsstts/vents-controller-aarch64:k0003.001 --modbus-host auxtel-vent-fan01.cp.lsst.org
If neither of the previous steps were successful, contact support on #summit-auxtel for help on manually power cycling the Raspberry Pi.
In the case of an emergency, when remote connection of the vent gate is not possible, observers may have to manually operate the vent gate and extraction fan to allow venting procedures to continue.
Verify and the vent gate controls are set to Manual. If not, follow instructions in the Set Manual Control section of this procedure.
Head to calibration hill, and locate vent gate #3 inside of the AuxTel dome. The vent gate is opposite of the main entrance on level 1.
Locate the vent gate control switch to the left of the vent gate (on the wall) and the extraction fan controller to the right of the vent gate (see image below).
If starting venting procedures, set the vent gate switch to
OPEN, and rotate the extraction dial clockwise until is reads 20Hz.If stopping venting procedures, rotate the extraction dial counter-clockwise until is reads 0Hz, and set the vent gate switch to
CLOSED.
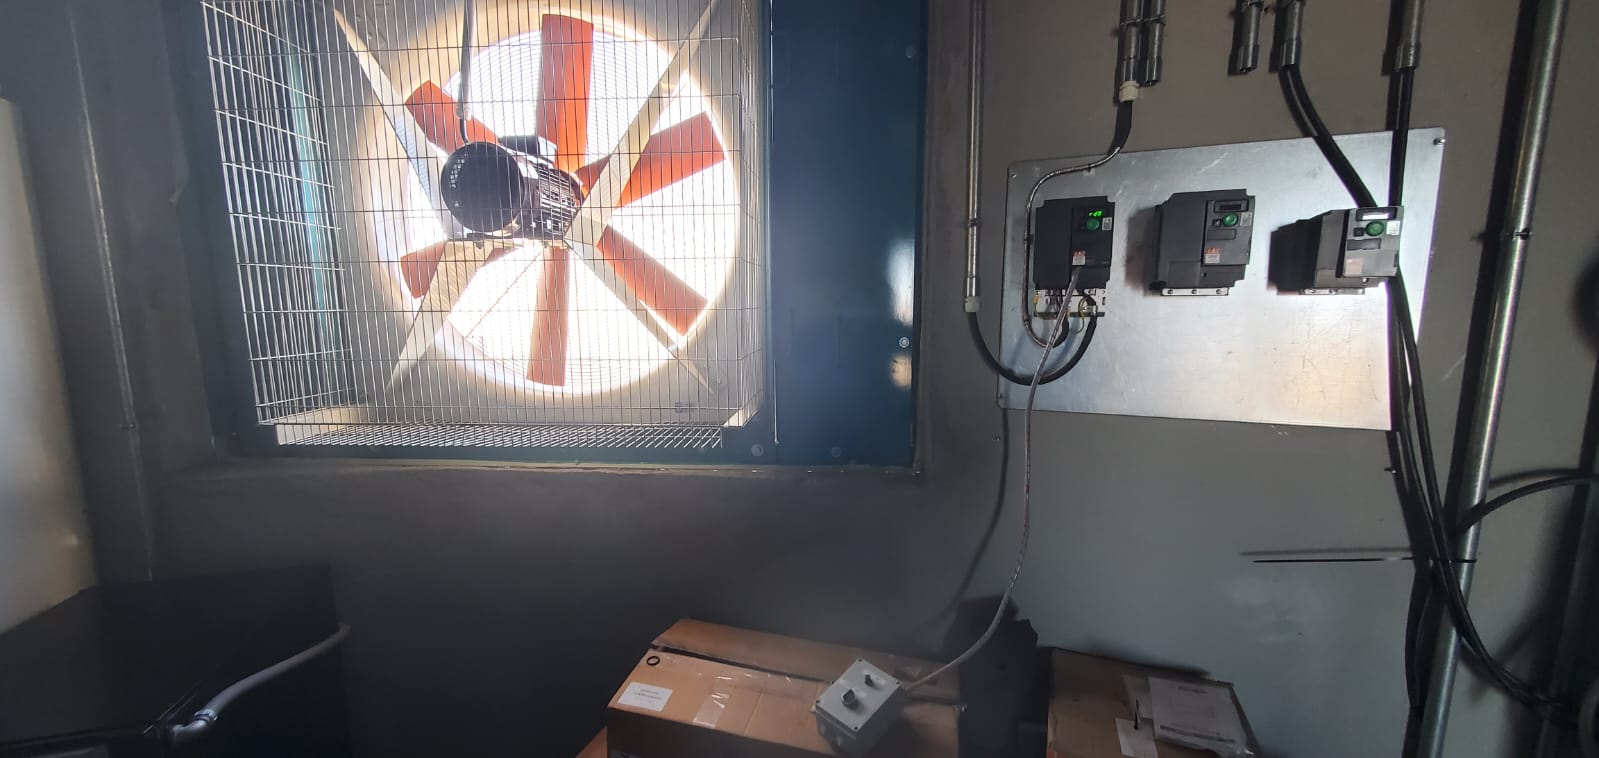
AuxTel Dome Vent Gate #3 and Extraction Fan with Controller.