Contributing to Observatory Operations Documentation
Below are instructions and guidelines on contributing to the Rubin Observatory Operations Documentation. This documentation is built with Sphinx and published to https://obs-ops.lsst.io.
This documentation is open source. Rubin Observatory welcomes contributions that make this documentation more useful and accurate.
Raising an Issue
If you spot an issue with the documentation, the best thing to do is raise a GitHub issue in the observatory-ops-docs repositiry (repo). Include any relevant URLs with your issue description.
Adding/Updating Documentation
These sections can help you to successfully contribute to the documentation:
For a refresher, refer to the Git Commands for Documentation.
Building the Documentation Locally
These are the basic steps to clone and build documents for the first time on your local computer. Keep in mind that some steps are not required if you have already started working on documentation prior to accessing this page.
Note
For the code blocks found in the Notes & Configurations column:
Executable code is denoted by the >> symbol.
Comments are marked with the # symbol.
Everything else is represented as outputs that should be displayed in the wrap/terminal.
Preconditions
Make sure that your computer is set up with the correct software before attempting to work on any documentation. The following steps provide a guideline for how to prepare your local computer to access observatory-ops-docs.
Steps |
Notes & Configurations |
|
|---|---|---|
Install Visual Studio Code (VSCode). |
It is our recommended text editor to work with reStructuredText (RST) language and Sphinx. Some useful extensions for Visual Studio Code when writing documents for Rubin in reStructuredText are: |
|
Clone GitHub repository into a local directory. |
In your terminal: >> git clone https://github.com/lsst-ts/observatory-ops-docs.git
|
|
Open the repository locally in VSCode. |
To open the repository, select:
File \(\Rightarrow\) Open Folder \(\Rightarrow\) observatory-ops-docs
|
|
Install project dependencies in a Python virtual environment. |
In your terminal: # Create virtual environment
>> python3 -m venv .venv
>> source .venv/bin/activate
# Add project dependencies
>> pip install --upgrade pip
>> pip install -r requirements.txt
|
|
Install SourceTree. |
This program helps visualize the repository tree interact with local and remote branches. To open the repository, select:
File \(\Rightarrow\) Open… \(\Rightarrow\) observatory-ops-docs
|
Jira & Git(Hub) Workflow
Once you have completed the Preconditions, you are ready to start building your own documents. These steps provide an overall workflow for writing documentation in your local repository and moving it into your remote GitHub repository. This workflow should help either start a new Jira ticket or to continue with a previous ticket.
Steps |
Notes & Configurations |
|
|---|---|---|
Create a Jira Ticket. |
Jira Ticket Layout Project: SITCOM Work Management
Issue Type: Story
Component: SIT-Com Organizational Support
Labels: documentation
Assignee: The person that’s going to write it (you or someone else).
Reviewer: Subsystem specialist/manager or one of the other members from the OS team.
Start and End Date: Estimate time interval.
|
|
Remember the ticket number and update your progress on the ticket. |
|
|
Set up the necessary tools for editing documentation. |
In your terminal: # Navigate to the folder:
>> cd /path/to/observatory-ops-docs
# Check that you are in correct folder:
>> pwd
/path/to/observatory-ops-docs
|
|
Initialize your local directory and check your connection to the obs-ops-docs repository. |
In your terminal: # Initialize:
>> git init
# Check remote is correct:
>> git remote -v
origin git@github.com:lsst-ts/observatory-ops-docs (fetch)
origin git@github.com:lsst-ts/observatory-ops-docs (push)
# If in different repository, switch using:
>> git remote set-url origin git@github.com:lsst-ts/observatory-ops-docs
Note This step is important for switching between multiple repositories. If you are working with documentation only then skip this step. |
|
Enter your python virtual environment. |
In your terminal: >> source .venv/bin/activate
|
|
Update local repository and create a new branch for the Jira ticket. |
In your terminal: # Update main branch
>> git checkout main
>> git fetch --all
>> git pull
# Create ticket branch (e.g., SITCOM-1811)
>> git branch tickets/SITCOM-1811
# Move to ticket branch:
>> git checkout tickets/SITCOM-1811
Note If you are continuing previous work:
|
|
Start editing RST files in obs-ops-docs using VSCode. |
Additonal aid for working with RST files: reStructuredText Review See the Documentation Style Guide to find resources on working with RST files and Sphinx in the Rubin Documentation style. |
|
Verify the html page loads properly using the terminal commands. |
In your terminal: # Build HTML Webpage:
>> make html
# Check Weblinks:
>> make linkcheck
# Visualize Changes Locally:
>> open _build/html/index.html
|
|
Add links to the ignore list in documenteer file (optional). |
Running a linkcheck may cause errors for links that are VPN-dependent or unavailable outside the summit.
Therefore they must be ignored for proper deployment.
In VSCode:
# Navigate to documenteer.toml and locate the linkcheck ignore list:
[sphinx.linkcheck]
ignore = [
    'http://love01.cp.lsst.org/*',
    'http://localhost:\d+/*',
     ...   ]

# Add new links to the end of the list:
[sphinx.linkcheck]
ignore = [
    'http://love01.cp.lsst.org/*',
    'http://localhost:\d+/*',
     ... ,
     'https://chronograf-base-efd.lsst.codes/', ]
Note Please only add new links and avoid modifying existing ones, as the check applies to the entire repository. |
|
Check changes on git and commit the changes. |
In your terminal: # Display files that need to be staged:
>> git status
# Stage files:
>> git add -A
# Commit files with message included:
>> git commit -m "INSERT MESSAGE HERE!"
Important When writing commits, make sure that they are short yet descriptive. |
|
Push the commits from the local repository to the remote repository. |
In your terminal: # Pushing for the first time:
>> git push --set-upstream origin tickets/SITCOM-1811
# Successive pushes are simply:
>> git push
|
|
Check remote webpage after deployment to see if the RST files loaded properly. |
|
Deployment
Whenever you push to the GitHub repository, the site is built for the corresponding branch. You can push to a branch you’ve created at any time.
However, the main branch is always published as https://obs-ops.lsst.io. Only authorized individuals can merge directly to main (may be delegated).
To incorporate your suggestions, you will need permission from others before you can merge your work.
Pull Requests & Review Process
Once your document is ready for review, a pull request must be created and sent to reviewers. This allows peer-reviewed verification of any potential updates to documentation in the https://obs-ops.lsst.io webpage. Reviewers can approve/disapprove mergers as well as provide corrections to your documents before deployment. The following steps will guide you through creating and managing a pull request on GitHub.
Steps |
Notes & Configurations |
|
|---|---|---|
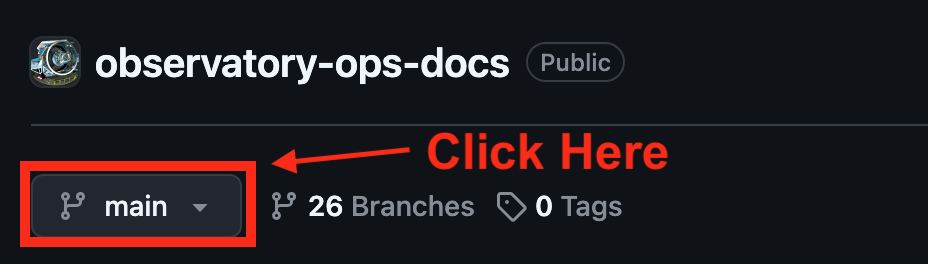
Navigate to obs-ops GitHub main page, and in the branch menu, choose the branch with your commits (e.g.,
tickets/SITCOM-1811).
|
|
|
Create a new pull request for the associated branch. |
After recent changes, a yellow banner will appear (see below) where you can click
Compare & pull request:

If there is no banner, you can create a new pull request on Github by selecting
Pull requests \(\Rightarrow\) New pull request:

|
|
Use the base branch dropdown menu to select the main branch you’d like to merge your changes into, then use the compare branch drop-down menu to select the ticket branch where you made your changes. |
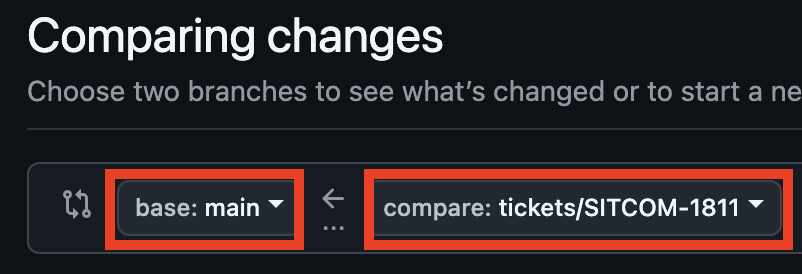
base \(\Rightarrow\) main
compare \(\Rightarrow\) tickets/SITCOM-1811
|
|
Add a title and description for your pull request and include reviewers. |
|
|
Click Create Pull Request to begin review process. |
|
|
Once comments are given, fix corrections using the
Jira & Git(Hub) Workflow steps. When the reviewers approve of the Pull Request, proceed to the Merging a Pull Request steps.
|
Note After you have opened your pull request, you can continue making changes to files by adding new commits to your head branch regardless if reviewer comments were sent. |
Merging a Pull Request
Once the pull request is approved, the document is ready to combine with the main page. Now all that is left is to make sure our branch is up-to-date, squash all of the commits that were created into a single commit, and merge our branch into the main project.
Steps |
Notes & Configurations |
|
|---|---|---|
Once reviewers approve of the pull request, and all comments were addressed, rebase your branch to allow a smoother merging process. |
In your terminal: # Update main branch:
>> git checkout main
>> git fetch --all
>> git pull
# Rebase main branch so that
# ticket branch is leading:
>> git checkout tickets/SITCOM-1811
>> git rebase origin/main
# FORCE push the changes into your
# remote repository:
>> git push --force-with-lease
Warning DO NOT REBASE USING GITHUB!
Updating on GitHub will likely cause issues between your local and remote repositories.
|
|
Once the rebase is successful, squash your commits into a single commit to reduce clutter in the log of the obs-ops workflow. |
There are two options to use when squashing commits:
|
|
Merge your ticket branch into the main branch. |
In your terminal: # Update local repository
# with the latest changes.
>> git pull origin main
# Switch to the base branch
# of the pull request.
>> git checkout main
# Merge the head branch into the
# base branch safely and preserve history.
>> git merge tickets/SITCOM-1811 --no-ff
# Push the changes.
>> git push -u origin main
Note You can merge directly in GitHub as well using the Merge pull request button at the bottom of your pull request page. |
|
Once merge was successful, update your local repository and prune any branches that have already merged in remote. |
In your terminal: # To update and prune:
>> git fetch --all -p
>> git pull
# (Optional) to prune a local branch:
>> git branch -d tickets/SITCOM-1811
|
Documentation Style Guide
New to reStructuredText and Sphinx
Check out these resources and guides. Sources files are available to compare raw reST and HTML outputs.